Saturday, 27 November 2010

Gestural drawing - more movement

No sooner had I recovered from the music and movement drawing than we were off again on gestural drawing - and drawing the moving model.  So we had the model moving around the studio whilst we were required to capture her movements....
It sounds so simple until you have to do it and then hand, brain and eye all fall out and start to argue with one another. Then the hand just declares UDI and gets on with it just capturing little bits here and there.  The brain and eyes after sulking for a bit are then just grateful that they have ANY input at all.

There is a freedom in capturing movement like this.  It also gave me the confidence to just get on a put a mark on the paper.  don't worry if it is right or wrong just put down a general impression and worry about the rest later.  I think this improved my mark making if only because I had to draw quickly and freely from the shoulder instead of getting all cramped up around the wrist.

The model then had two sitting poses.  One where she moved in her seat talking to people around the room and the second where she sat, reading the paper and drinking from her flask.


the final exercise in this workshop was a tad more complex.  We had 3 sheets of tracing paper.  On the first we drew the model standing at the foot of the bed.  On the second the model was sitting on the end of the bed and in the third she lay on the bed.  we then had to line up the three pieces one on top of the other as below:


Initiallt I thought this was just an exercise and so what however... I am now thinking of using the tracing paper with a drawn environment to show Chris moving around our kitchen but more of that in my next post.

Music and movement

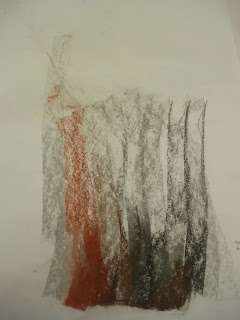
On our return from reading week we started with "sound" drawing. This workshop required a lot of paper and I mean a LOT.  It also needs a great deal of whatever drawing media one chooses to use.  I went for pastels and determined to just go with the flow.  Whilst different types of music were played to us we made marks in a way that we felt expressed the music:


At the end we were asked to identify three pieces or marks within a piece that we particularly liked.  My choices are below:


We then had to use the "EXACT" marks to draw the model.  I am afraid Helen our tutor was tearing her hair out.  I just couldn't seem to understand what she wanted so i had a number of botched attempts:


before Helen took me to one side and explained in words of one syllable what I had to do before one of us died!!!!!!!!

So USING THE EXACT MARKS.  SAME colour, SAME shape, SAME alignment....


Became....


Whilst

Turned into

And in close up


And finally

Became:


Helen is incredibly patient and I don't deserve her as a tutor.  She is really making me doubt and question my drawing ability and observational skills.  I know she said at the start of the semester that we would all end up hating her but whilst this is very "tough love" it is a fabulous opportunity to learn and broaden my drawing skills.  I have been far too complacent for far too long.

Using the freedom of the music to create marks and to then analyse what is produced will I hope inform what I am doing elsewhere in my Painting studio practice.  More about that anon.


Friday, 26 November 2010

Back at last

After nearly 6 weeks absence I am back up and blogging again.  Yes, I have been busy doing my art degree but life has been intervening ad well.  Father in law has been gravely ill so Chris and I have been spending time in Durham.  I have been spending a lot of time concentrating on driving and managed to pass my test at the first attempt on 29 October so am roaming freely at the moment! And sadly Featherstonhaugh, my favourite cat died on 2 November from kidney failure.  But on with the artwork....

My despair in drawing studies continues.  Everynow and then there is a glimmer of hope but my lack of observational discipline keeps coming back to haunt me.  Our next task was to use tone rather than line to draw with.  Sheets of paper are covered with charcoal and then using either a plastic or kneedable rubber the charcoal is lifted out of the picture so:

Sadly I managed to get two half pictures here: the head and torso and then the lower leg and foot.  I managed to screw up the proportions of the upper leg completely....


and


Upton was standing next to me and because he is very good he got it right AND he was kind enough to let me share his work on my blog.  Upton's study:


We then did two more studies but once again I was not concentrating on my observation and so the pieces are at best rather lack lustre:


The poor model really didn't deserve this last one at all.

Thursday, 14 October 2010

Drawing studies - private study

Here I have been playing about with the images in some old photos of me and my father.  I want to use these images to create a series of pictures that peel back the layers that time and sophistication have built up to try to recreate the halcyon days of my childhood.


I have used this image to create an embroidered drawing


Using embroidery to create the drawing of a young girl is also questioning both her role in society and her femininity - embroidery being very much a feminine means of expression.

If I don't create something soon I shall burst

My studio practice for this semester is painting.  So far we have looked at the practical side of stretching paper and canvases but we still haven't set brush to canvas yet.  Our brief is Still/moving and I have used Fritz Lang's Metropolis and urban architecture as my starting point.  I have played around with ideas which I will post in due course but the point of this post is until I can get my stretchers I can't prepare any canvii (plural of canvas) and until I have a canvas I can't paint.  And if I can't creat I WILL BURST!!!!!!!

With that in mind I spent Tuesday morning on my own with a lot of cartridge paper, some PVA glue and a stick of complessed charcoal.  I started by taping 4 sheets of A1 size cartridge paper together and then had me some fun!!

Layering up torn cartridge paper to create rough contours of face

Adding charcoal definition

PVA and more paper.  Also use PVA to work the charcoal


The picture so far....

There is still a long way to go but at last I feel as though I am doing something not just thinking about doing something.

The Full-on Drawing Session - Part 2

 Further quick fire poses followed.  First using the hand you do not normally favour - for me this is my right hand.  It felt very hard not being in control of the charcoal which felt unfamillilar in my right hand.  But the picture was much better than I anticipated.  This says a lot about hand eye co-ordination and about how I at least think TOO much about the marks I am making being "correct".  In this exercise it was as much as I could do to just make the mark.  Perhaps I should use my right hand more often if only to help me improve on my proportions.
Next we drew the figure whilst not looking at the paper.  There is a solidity and a feeling of form to this drawing together with a simplicity of line that I really like.


Next up: not looking at the paper AND using the hand we do not normally use.  There is a soft, feminine feel to the line here with the shape almost foetal in form.


One short break and then back to it.  This time taking random words from the dictionary and drawing in that syle.  So model in the style of a CUBE:


Model in the style of MAD:

Model in the style of PIZZICATO


And finally model in the syle of FAVOURITE (I took this to mean my favourite style)


Finally student in the form of a small blob of grease on the floor. Two and a half hours of really intense work and concentration but a great deal of fun and I have learnt a lot about how I translate images onto paper.